In this chapter we shall learn about below topics:
2.1 Introduction to Linked List
2.2 Insert elements into stack using linked list
2.3 Implementation of Stack using Linked List
2.4 Output of the program
In the previous chapter we have seen introduction to stack and its implementation using Arrays.
In this chapter we shall see how to implement stack using Linked List.
As till now we have not used LL, below are some Linked List [LL] Basics: In the next chapters we shall learn more about Linked List.
2.1 Introduction to Linked List
A simple linked list will have a variable to hold the data and there should be a “self-referential pointer”. A pointer that refers to the same structure is called as a “self-referential pointer”.
A simple LL will look as below:
struct node
{
	int data;
	struct node *next;
};
2.2 Let Us first see, how to insert elements into the stack using linked list.
As we know that we have to insert element at the start of the linked list. And the head pointer should always point to the first element.
We do this in 4 steps:
Step 1: Allocate memory for the new node as a temp node.
Step 2: Update the data field to hold the value.
Step 3: Point the “next” pointer of the temp node to the head pointer. Thus making the temp pointer as the head node.
Step 4: Return the “temp” node.
The above 4 steps can be visualised as below:
Step 1: Allocate memory for temp variable
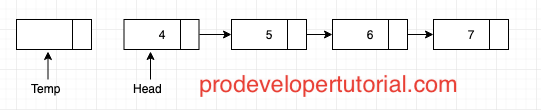
Step 2: Update the data field of temp node with the value.
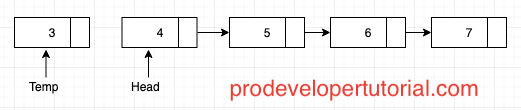
Step 3: Copy the address of first node to the “next” pointer of temp node.

Step 4: Return temp node.
2.3 Implementation of Stacks using Linked List in C
#include<stdio.h>
#include<stdlib.h>

//store current size of stack
int top = 0;

//Max Stack size
int MaxSize = 5;

struct node
{
	int data;
	struct node *next;

};

//make "head" pointer as global for easy access
struct node *head=NULL;


//check if list is empty
int IsFull()
{

	if(top == MaxSize)
	{
		return 1;
	}
	else
	{
		return 0;
	}
}

//check if stack is empty
int isempty()
{
	if(top == 0)
	{
		return 1;
	}
	else
	{
		return 0;
	}
}

void pop()
{

	if(isempty())
	{
		printf("The stack is Empty!");
	}
	else
	{
		top--;
		struct node* temp;
		temp = head;
		head = temp->next;
		//freeing the memory consumed is important
		free(temp);

	}
}

void push(int value)
{

 	if(IsFull())
 	{
		printf("Stack is Full!\n");
	}
	 else
	{
		top++;

		//take a temp node
		struct node *temp;

		//allocate memory for that temp node
		temp=(struct node*)malloc(sizeof(struct node));

		//copy the value to the data field
		temp->data=value;

		//copy the previous head to the temp -> next pointer
		temp->next=head;

		//update temp as latest head.
		head=temp;

	}
}

void display()
{

	struct node* temp;
	temp=head;
	while(temp!=NULL)
	{
		printf("%d\n",temp->data);
		temp=temp->next;
	}
}


int main()
{
	int choice;
	while(choice != 4)
	{
		printf("\t===================\n");
		printf("\t\tSTACK\n");
		printf("\t===================\n");
		printf("Choose One\n\n");
		printf("1)PUSH\n");
		printf("2)POP\n");
		printf("3)Display\n");
		printf("4)Logout\n\n");

		int option;
		int a;
		scanf("%d",&option);
			switch(option)
			{
				case 1:

					printf("Enter Number:\n");
					scanf("%d",&a);
					push(a);
					break;
				case 2:
					pop();
					break;
				case 3:
					display();
					break;
				case 4:
					choice = 4;
					break;
				default:
				printf("Wrong Input\n\n");

			}
	}
}
2.4 Output of the program
        ===================
		STACK
	===================
Choose One

1)PUSH
2)POP
3)Display
4)Logout

2
The stack is Empty!
        ===================
		STACK
	===================
Choose One

1)PUSH
2)POP
3)Display
4)Logout

3
	===================
		STACK
	===================
Choose One

1)PUSH
2)POP
3)Display
4)Logout

1
Enter Number:
2
	===================
		STACK
	===================
Choose One

1)PUSH
2)POP
3)Display
4)Logout

3
2
	===================
		STACK
	===================
Choose One

1)PUSH
2)POP
3)Display
4)Logout