In this chapter we shall learn about below topics:
7.1 Introduction to Queue Data Structure
7.2 Pictorial Representation of Queue
7.3 Disadvantages of Queue Data Structure
7.4 Operations performed on Queue Data Structure
7.5 Implementation of Queue Data Structure
7.6 Output of the program
7.1 What is a Queue?
A queue is a data structure where the elements are inserted from one end and are deleted from the other end.
The place where the elements are inserted is called as rear end, and the place where the elements are deleted is called as front end.
Hence the element that is inserted first is the first element to be deleted.
So Queue is also called as First In First Out [FIFO] data structure.
7.2 Pictorial representation of Queue:
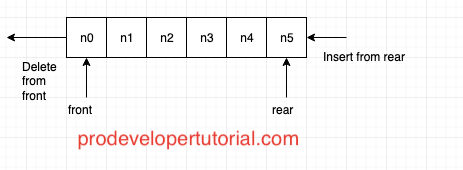
From the above image we can see below steps happening:
1. The Queue is an array with 2 variables “front” and “rear”.
2. The variable “front” is used to access the first element, the variable “rear” is used to access last element.
3. When deleting an element, the “front” variable will be incremented by 1, thus deleting that element.
7.3 Disadvantage of queue:
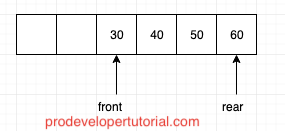
From the above image, we can see that first 2 positions are empty. But if we try to insert an element, the program will throw us “queue full” message, because it cannot access the front elements. Thus wasting space.
To overcome this problem, we use “Circular Queue”. We shall study about it in next chapters.
7.4 Operations Performed On Queue:
Insert: Insert element in the rear end.
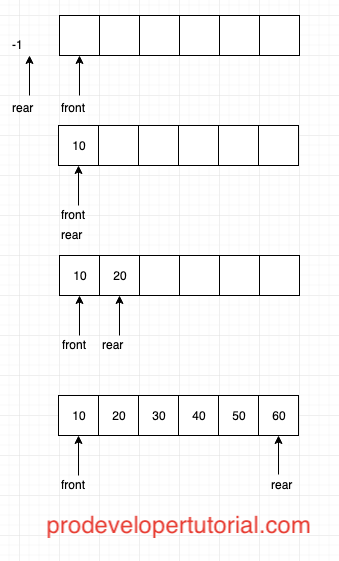
As you can see from the above image, initially, “front” pointer will be at index 0 and “rear” pointer will be at index -1.
Once we start inserting the elements, we start to increment “rear” pointer keeping “front” pointer as it is.
Delete: Delete element in the front end.
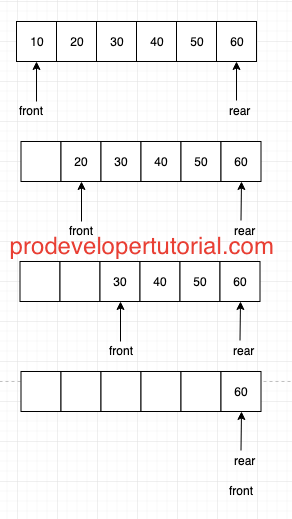
As you can see from the image above, now we update the “front” pointer when we remove the elements.
Overflow: Check if queue is having space, while inserting a new element, else will result in overflow.
Underflow: Check if queue is empty and we try to delete an element, will result in underflow.
7.5 Implementation of Queue Data Structure
#include<stdio.h>
#include<stdlib.h>

#define QUEUE_SIZE	5

int rear_end; /* a variable to insert element at rear end */
int front_end; /* a variable to delete element at front end */
int queue_elements [10]; /* An array to hold queue elements */
int queue_item; /* a variable to hold the item to be inserted */

void InsertQueue()
{
	if (rear_end == QUEUE_SIZE -1)
	{
		printf("Queue is full\n\n");
		return;
	}

	rear_end += 1;
	queue_elements[rear_end] = queue_item;
}

int DeleteQueue()
{
	if (front_end > rear_end)
	{
		return -1;
	}
	else
	{
		return queue_elements[front_end++];
	}
}


void DisplayQueue()
{
	int i = 0;

	if(front_end > rear_end)
	{
		printf("Queue is empty\n");
		return;
	}
	printf("The Queue has:\n");

	for ( i =  front_end; i <= rear_end; ++i)
	{
		printf("%d\n",queue_elements[i] );
	}
}


int main()
{
	int choice = 0;

	front_end = 0;
	rear_end = -1;


	for( ; ; )
	{
		printf("1. Insert \n2. Delete \n3. Display \n4. Exit\n");

		scanf("%d", &choice);

		switch(choice)
		{
			case 1:
				printf("\nEnter the item to be inserted\n");
				scanf("%d", &queue_item);

				InsertQueue();
			break;

			case 2:
				queue_item = DeleteQueue();

				if(queue_item == -1)
					{
						printf("Queue is empty\n");
					}
					else
					{
						printf("Deleted Item = %d\n",queue_item );
					}
			break;

			case 3:
				DisplayQueue();
				break;

			default:
				exit(0);
		}
	}

	return 0;
}
7.6 Output of the program
1. Insert
2. Delete
3. Display
4. Exit

3
Queue is empty
1. Insert
2. Delete
3. Display
4. Exit
1

Enter the item to be inserted
1
1. Insert
2. Delete
3. Display
4. Exit
1

Enter the item to be inserted
2
1. Insert
2. Delete
3. Display
4. Exit
1

Enter the item to be inserted
3
1. Insert
2. Delete
3. Display
4. Exit
3
The Queue has:
1
2
3
1. Insert
2. Delete
3. Display
4. Exit
2
Deleted Item = 1
1. Insert
2. Delete
3. Display
4. Exit
4